1.vpp版本
笔者这里使用的vpp版本是最新git下来的,show version信息如下
DBGvpp# show version
vpp v19.04-rc0~531-g537e85d built by ych on localhost.localdomain at Wed Mar 27 10:17:26 CST 2019
2.插件介绍
vpp的软件框架主要分为四个层面:
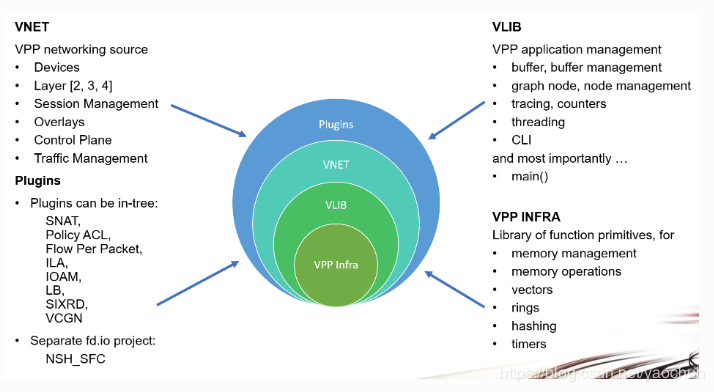
top     ├──Plugins     包含越来越丰富的数据平面插件集,可以认为每一个插件是一个小型的应用app
│       │
│       ├──VNET        与VPP的网络接口(第2,3和4层)协同工作,执行会话和流量管理,并与设备和数据控制平面配合使用
│       │
│       ├──VLIB        矢量处理库。vlib层还处理各种应用程序管理功能:缓冲区,内存和图形节点管理,维护和导出计数器,线程管理,数据包跟踪。Vlib实现调试CLI(命令行界面)
│       │
bottom  └──VPP Infra   VPP基础设施层,包含核心库源代码。该层执行内存函数,与向量和环一起使用,在哈希表中执行键查找,并与定时器一起用于调度图节点
每一个插件在vpp里面有不同的node构成,每一个node主要分为以下四种类型:
-
VLIB_NODE_TYPE_INTERNAL
内部节点,最典型的节点接收缓冲向量,执行操作。vpp大部分节点是这个角色,主要对数据流做内部处理,比如ip4-input-no-checksum/ip4-icmp-input等内部功能节点 -
VLIB_NODE_TYPE_INPUT
输入节点,通常是设备输入节点。从零开始创建框架并分派到内部节点(internal), 比如dpdk-input/af-packet-input节点,
input节点收包模式分为轮询和中断两种模式vlib_node_state_t. -
VLIB_NODE_TYPE_PRE_INPUT
输入节点前处理的节点,暂时在vpp里面没用用到 -
VLIB_NODE_TYPE_PROCESS
线程节点,和线程一样,可以可以暂停、等待事件、恢复,不同于pthread_thread,他是基于setjump/longjump实现的弦程.
等待一个事件:always_inline f64 vlib_process_wait_for_event_or_clock (vlib_main_t vm, f64 dt)
发送一个事件: always_inline void vlib_process_signal_event (vlib_main_t vm, uword node_index, uword type_opaque, uword data)
3.注册节点
3.1 注册一个输入节点
VLIB_REGISTER_NODE (dpdk_input_node) = {
  .type = VLIB_NODE_TYPE_INPUT,
  .name = "dpdk-input",
  .sibling_of = "device-input",

  /* Will be enabled if/when hardware is detected. */
  .state = VLIB_NODE_STATE_DISABLED,

  .format_buffer = format_ethernet_header_with_length,
  .format_trace = format_dpdk_rx_trace,

  .n_errors = DPDK_N_ERROR,
  .error_strings = dpdk_error_strings,
};
3.2 注册一个内部结点
VLIB_REGISTER_NODE (myplugin_node) =
{
  .name = "myplugin",
  .vector_size = sizeof (u32),
  .format_trace = format_myplugin_trace,
  .type = VLIB_NODE_TYPE_INTERNAL,

  .n_errors = ARRAY_LEN(myplugin_error_strings),
  .error_strings = myplugin_error_strings,

  .n_next_nodes = MYPLUGIN_N_NEXT,

  /* edit / add dispositions here */
  .next_nodes = {
        [MYPLUGIN_NEXT_INTERFACE_OUTPUT] = "interface-output",
  },
};
3.3 注册一个线程节点
VLIB_REGISTER_NODE (myplugin_periodic_node) =
{
  .function = myplugin_periodic_process,
  .type = VLIB_NODE_TYPE_PROCESS,
  .name = "myplugin-periodic-process",
};
4.创建一个插件基本框架
在最新的版本,vpp提供了一个创建插件的脚本,直接使用这个脚本就可以创建我们需要的插件基本框架。
如果自己系统没有安装emacs,需要安装一下,否则脚本运行会失败,我自己的系统是centos,所以需要安装
sudo yum install -y emacs需要提供两个设置:
- 插件的名字
- 调度类型,有双单环路对还是四单环路对
下面是具体命令:
$ cd ./src/plugins
$ ../../extras/emacs/make-plugin.sh
<snip>
Loading /scratch/vpp-docs/extras/emacs/tunnel-c-skel.el (source)...
Loading /scratch/vpp-docs/extras/emacs/tunnel-decap-skel.el (source)...
Loading /scratch/vpp-docs/extras/emacs/tunnel-encap-skel.el (source)...
Loading /scratch/vpp-docs/extras/emacs/tunnel-h-skel.el (source)...
Loading /scratch/vpp-docs/extras/emacs/elog-4-int-skel.el (source)...
Loading /scratch/vpp-docs/extras/emacs/elog-4-int-track-skel.el (source)...
Loading /scratch/vpp-docs/extras/emacs/elog-enum-skel.el (source)...
Loading /scratch/vpp-docs/extras/emacs/elog-one-datum-skel.el (source)...
Plugin name: myplugin
Dispatch type [dual or qs]: dual
(Shell command succeeded with no output)

OK...
调度类型暂时我还不太清楚有多大差异,暂时选择dual模式,后面自己根据自己业务,对插件做相关的修改就行。
生成出来的文件:
$ cd ./myplugin
$ ls
CMakeLists.txt        myplugin.c           myplugin_periodic.c  setup.pg
myplugin_all_api_h.h  myplugin.h           myplugin_test.c
myplugin.api          myplugin_msg_enum.h  node.c
5.编译插件
$ cd <top-of-workspace>
$ make rebuild [or rebuild-release]
6.验证插件是否正常
$ cd <top-of-workspace>
$ make run
<snip>
load_one_plugin:189: Loaded plugin: myplugin_plugin.so (myplugin description goes here)
<snip>
load_one_vat_plugin:67: Loaded plugin: myplugin_test_plugin.so
<snip>
DBGvpp#
如果上面有显示自己插件的信息,表示你提供的插件功能基本完备,能正常加载使用了.
7.测试插件
默认创建的插件已经实现了以下功能:
注册了process节点,监听插件是否工作的事件(MYPLUGIN_EVENT_PERIODIC_ENABLE_DISABLE),
通过命令行来触发(VLIB_CLI_COMMAND (myplugin_enable_disable_command, static))这个事件。
使用这里enable了,该插件才会work。
注册了内部节点,让其在ethernet-input节点运行之前运行。
VLIB_REGISTER_NODE (myplugin_node) =
{
  .name = "myplugin",
  .vector_size = sizeof (u32),
  .format_trace = format_myplugin_trace,
  .type = VLIB_NODE_TYPE_INTERNAL,

  .n_errors = ARRAY_LEN(myplugin_error_strings),
  .error_strings = myplugin_error_strings,

  .n_next_nodes = MYPLUGIN_N_NEXT,

  /* edit / add dispositions here */
  .next_nodes = {
        [MYPLUGIN_NEXT_INTERFACE_OUTPUT] = "interface-output",
  },
};

VNET_FEATURE_INIT (myplugin, static) =
{
  .arc_name = "device-input",
  .node_name = "myplugin",
  .runs_before = VNET_FEATURES ("ethernet-input"),
};
在内部节点的实现函数里面(VLIB_NODE_FN (myplugin_node)),主要实现功能是对input节点收进来的报文,做一个src dst mac交换,然后源端口发送出去。
ok,到此为止我们知道这个模板插件能做的事情了,下面我们测试一下,我们结合前面的vpp+dpdk环境,测试一下这个模型。
8.测试
将dpdk网口up起来
set int state eth0 up
开启网口的混杂模式
set int promiscuous on eth0
使能我们的插件
myplugin enable-disable eth0
dpdk网口对端发包
预期结果
在发送侧:每发送一个报文,能在本端口收到一个src mac和dst mac交换的报文.
在vpp测,可以看到网口收发包统计和trace信息:

00:01:24:063351: dpdk-input
  eth0 rx queue 0, tid=233990336
  buffer 0x13b1d4: current data 0, length 554, buffer-pool 1, ref-count 1, totlen-nifb 0, trace 0x0
                   ext-hdr-valid
                   l4-cksum-computed l4-cksum-correct
  PKT MBUF: port 0, nb_segs 1, pkt_len 554
    buf_len 2176, data_len 554, ol_flags 0x182, data_off 128, phys_addr 0x4ec7580
    packet_type 0x211 l2_len 0 l3_len 0 outer_l2_len 0 outer_l3_len 0
    rss 0x54078cbc fdir.hi 0x0 fdir.lo 0x54078cbc
    Packet Offload Flags
      PKT_RX_RSS_HASH (0x0002) RX packet with RSS hash result
      PKT_RX_IP_CKSUM_GOOD (0x0080) IP cksum of RX pkt. is valid
      PKT_RX_L4_CKSUM_GOOD (0x0100) L4 cksum of RX pkt. is valid
    Packet Types
      RTE_PTYPE_L2_ETHER (0x0001) Ethernet packet
      RTE_PTYPE_L3_IPV4 (0x0010) IPv4 packet without extension headers
      RTE_PTYPE_L4_UDP (0x0200) UDP packet
  IP4: 00:12:34:56:78:9a -> 00:11:22:33:44:55
  UDP: 1.1.1.2 -> 2.2.2.2
    tos 0x00, ttl 64, length 540, checksum 0x72ca
    fragment id 0x0001
  UDP: 521 -> 521
    length 520, checksum 0x9c70
00:01:24:063375: myplugin
  MYPLUGIN: sw_if_index 1, next index 0, tid=233990336
  new src 00:11:22:33:44:55 -> new dst 00:12:34:56:78:9a
00:01:24:063434: eth0-output
  eth0 l4-cksum-computed l4-cksum-correct
  IP4: 00:11:22:33:44:55 -> 00:12:34:56:78:9a
  UDP: 1.1.1.2 -> 2.2.2.2
    tos 0x00, ttl 64, length 540, checksum 0x72ca
    fragment id 0x0001
  UDP: 521 -> 521
    length 520, checksum 0x9c70
00:01:24:063442: eth0-tx
  eth0 tx queue 1
  buffer 0x13b1d4: current data 0, length 554, buffer-pool 1, ref-count 1, totlen-nifb 0, trace 0x0
                   ext-hdr-valid
                   l4-cksum-computed l4-cksum-correct
  PKT MBUF: port 0, nb_segs 1, pkt_len 554
    buf_len 2176, data_len 554, ol_flags 0x182, data_off 128, phys_addr 0x4ec7580
    packet_type 0x211 l2_len 0 l3_len 0 outer_l2_len 0 outer_l3_len 0
    rss 0x54078cbc fdir.hi 0x0 fdir.lo 0x54078cbc
    Packet Offload Flags
      PKT_RX_RSS_HASH (0x0002) RX packet with RSS hash result
      PKT_RX_IP_CKSUM_GOOD (0x0080) IP cksum of RX pkt. is valid
      PKT_RX_L4_CKSUM_GOOD (0x0100) L4 cksum of RX pkt. is valid
    Packet Types
      RTE_PTYPE_L2_ETHER (0x0001) Ethernet packet
      RTE_PTYPE_L3_IPV4 (0x0010) IPv4 packet without extension headers
      RTE_PTYPE_L4_UDP (0x0200) UDP packet
  IP4: 00:11:22:33:44:55 -> 00:12:34:56:78:9a
  UDP: 1.1.1.2 -> 2.2.2.2
    tos 0x00, ttl 64, length 540, checksum 0x72ca
    fragment id 0x0001
  UDP: 521 -> 521
length 520, checksum 0x9c70[原文链接](https://blog.csdn.net/yaochuh/article/details/88841633)