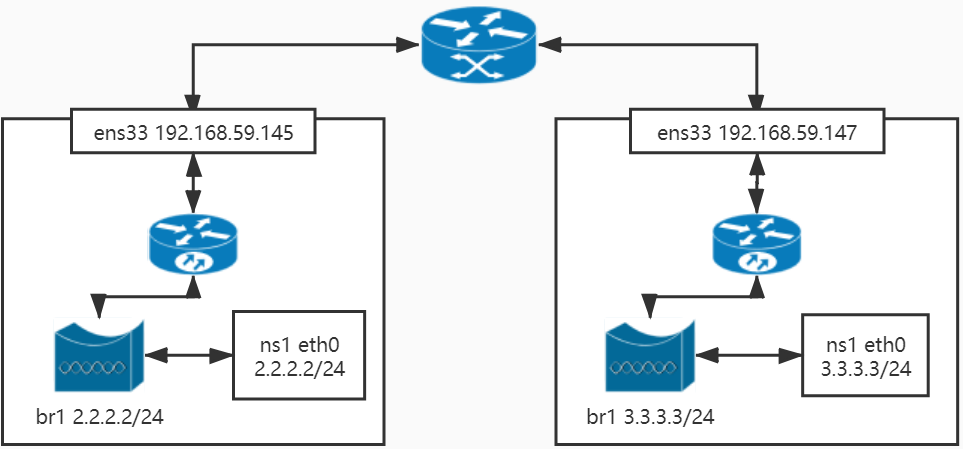
实验参考文章https://segmentfault.com/a/1190000019892263,并进一步解释完善。
一、BGP查询CLI命令
对frr的配置文件/etc/frr/daemon进一步修改,改为bgpd=yes启动bgp。通过vtysh命令行接口,查询frr中bgp配置
show ip bgp [x.x.x.x](longer)
show ip bgp summary
show ip route [x.x.x.x](longer)
show ip bgp neighbor [x.x.x.x]
show ip bgp neighbor x.x.x.x advertisedd-routes
show ip bgp neighbor x.x.x.x received-routes

debug bgp all
debug bgp flowspec
clear bgp * (soft in/soft out)
二、实验
使用frr搭建一个bgp网络环境,练习如下功能:
- 两个frr路由器建立邻居关系
- 将igp路由注入bgp
- bgp路由通过igp传递学习到对端
- frr通过zebra将路由同步内核,实现两个网络通过动态路由互通

1.配置主机
主机1
这里veth1放置在内核全局路由表,非ns空间内;它和ens33在同一表;
###通过frr中的vtysh配置vtysh
vtysh
#查看配置
show running-config
#进行配置
config
#bgp 配置
router bgp 7675
 bgp router-id 192.168.59.145
 neighbor 192.168.59.147 remote-as 7676
 !
!
#通过shell配置一个host
sudo ip netns add ns1
# 创建pair对,veth1和eth0互联;eth0配置ip是路由实际生效
sudo ip link add veth1 type veth peer name eth0 netns ns1
sudo ip netns exec ns1 ip link set eth0 up
sudo ip netns exec ns1 ip link set lo up
sudo ip netns exec ns1 ip addr add 2.2.2.2/24 dev eth0
sudo ip netns exec ns1 ip route add default via 2.2.2.254 dev eth0
#veth1放在global空间上,同bgp同命名空间
sudo ip link set veth1 up
sudo ip link add br1 type bridge
sudo ip link set br1 up
sudo ip link set veth1 master br1
sudo ip addr add 2.2.2.254/24 dev br1
#打开转发开关
[root@localhost ~]#  sudo -i
[root@localhost ~]#  echo 1 > /proc/sys/net/ipv4/ip_forward
主机2
#bgp 配置
router bgp 7676
 bgp router-id 192.168.59.147
 neighbor 192.168.59.145 remote-as 7675
 !
!
#配置一个host
sudo ip netns add ns1
sudo ip link add veth1 type veth peer name eth0 netns ns1
sudo ip netns exec ns1 ip link set eth0 up
sudo ip netns exec ns1 ip link set lo up
sudo ip netns exec ns1 ip addr add 3.3.3.3/24 dev eth0
sudo ip netns exec ns1 ip route add default via 3.3.3.254 dev eth0
sudo ip link set veth1 up
sudo ip link add br1 type bridge
sudo ip link set br1 up
sudo ip link set veth1 master br1
sudo ip addr add 3.3.3.254/24 dev br1
#打开转发开关
[root@localhost ~]#  sudo -i
[root@localhost ~]#  echo 1 > /proc/sys/net/ipv4/ip_forward
2.BGP配置,宣告网段
vtysh
#查看配置
show running-config
#进行配置
config
#bgp 配置中宣发路由
router bgp 7675
#在ipv4 单播中宣发路由
address-family ipv4 unicast
主机1
[root@localhost ~]# network 2.2.2.0/24
主机2
[root@localhost ~]# network 3.3.3.0/24
3.查看配置结果
主机1
bogon# show ip route
Codes: K - kernel route, C - connected, S - static, R - RIP,
       O - OSPF, I - IS-IS, B - BGP, E - EIGRP, N - NHRP,
       T - Table, v - VNC, V - VNC-Direct, A - Babel, D - SHARP,
       F - PBR, f - OpenFabric,
       > - selected route, * - FIB route, q - queued route, r - rejected route

K * 0.0.0.0/0 [0/102] via 192.168.59.254, ens38, 00:25:34
K * 0.0.0.0/0 [0/101] via 192.168.59.254, ens37, 00:25:34
K>* 0.0.0.0/0 [0/100] via 192.168.59.254, ens33, 00:25:34
C>* 2.2.2.0/24 is directly connected, br1, 00:17:11
B>* 3.3.3.0/24 [20/0] via 192.168.59.147, ens33, 00:01:07
C * 192.168.59.0/24 is directly connected, ens38, 00:25:34
C * 192.168.59.0/24 is directly connected, ens37, 00:25:34
C>* 192.168.59.0/24 is directly connected, ens33, 00:25:34
主机2
localhost.localdomain# show ip route
Codes: K - kernel route, C - connected, S - static, R - RIP,
       O - OSPF, I - IS-IS, B - BGP, E - EIGRP, N - NHRP,
       T - Table, v - VNC, V - VNC-Direct, A - Babel, D - SHARP,
       F - PBR, f - OpenFabric,
       > - selected route, * - FIB route, q - queued route, r - rejected route

K * 0.0.0.0/0 [0/101] via 192.168.59.254, ens37, 00:04:06
K>* 0.0.0.0/0 [0/100] via 192.168.59.254, ens33, 00:04:06
B>* 2.2.2.0/24 [20/0] via 192.168.59.145, ens33, 00:01:19
C>* 3.3.3.0/24 is directly connected, br1, 00:03:12
C * 192.168.59.0/24 is directly connected, ens37, 00:04:06
C>* 192.168.59.0/24 is directly connected, ens33, 00:04:06
从上面可以看出,两个主机分别有了对等体发布的路由,对等体发布的路由会自动注入igp路由中。标号为B>。
错误排查:
1)通过show ip bgp summary查看建立连接状态,如果发现一直建立状态为active状态,说明建立tcp失败,可能是因为没有设置默认路由或网关,或端口被关闭。
2)查看每个部分都能ping通,如果本机无法ping通netns内部地址,需要排查网桥等原因。
4.测试
主机1
[root@localhost ~]# sudo ip netns exec ns1 ping 3.3.3.3 -c 2
PING 3.3.3.3 (3.3.3.3) 56(84) bytes of data.
64 bytes from 3.3.3.3: icmp_seq=1 ttl=62 time=0.372 ms
64 bytes from 3.3.3.3: icmp_seq=2 ttl=62 time=0.339 ms

--- 3.3.3.3 ping statistics ---
2 packets transmitted, 2 received, 0% packet loss, time 32ms
rtt min/avg/max/mdev = 0.339/0.355/0.372/0.025 ms
[root@localhost ~]# ping 3.3.3.254
主机2
[root@localhost ~]# sudo ip netns exec ns1 ping 2.2.2.2 -c 2
PING 2.2.2.2 (2.2.2.2) 56(84) bytes of data.
64 bytes from 2.2.2.2: icmp_seq=1 ttl=62 time=0.564 ms
64 bytes from 2.2.2.2: icmp_seq=2 ttl=62 time=0.359 ms

--- 2.2.2.2 ping statistics ---
2 packets transmitted, 2 received, 0% packet loss, time 3ms
rtt min/avg/max/mdev = 0.359/0.461/0.564/0.104 ms
[root@localhost ~]# ping 2.2.2.254 微信赞赏
微信赞赏 支付宝赞赏
支付宝赞赏