目录
[〇. 前言]
[一. ACL_PLUGIN实现访问控制]
[1.1.ACL_PLUGIN控制命令归纳]
[1.2.ACL_PLUGIN简单实验测试]
[ 二. CLASSIFY实现访问控制]
[2.1.CLASSIFY中ACL命令归纳]
[2.2.CLASSIFY简单实验测试]
参考官方文档:
https://docs.fd.io/vpp/19.08/clicmd_src_plugins_acl.html#clicmd_set_acl-plugin
https://docs.fd.io/vpp/19.08/clicmd_src_vnet_classify.html#clicmd_classify_session
VPP版本:19.08
〇、前言
VPP(Vector Packet Processing)是思科旗下的一款可拓展的开源框架,提供容易使用的、高质量的交换、路由功能。
VPP实现ACL(Access Control List)访问控制的两种方法:
- acl-plugin,通过vat或者api接口配置
因为其拥有更丰富的语义控制功能,能解释ipv6扩展头,并通过permit+reflect反向策略进行轻量级会话跟踪,同时配合abf 插件实现策略路由。
- 基于流量分类的classify,通过vppctl或api实现配置
因本质上classify是基于bit位掩码实现的,且为无状态控制,所以速度会快于acl-plugin。类似的功能还能实现QOS控制。
关于这两种方法的区别参考:https://www.mail-archive.com/vpp-dev@lists.fd.io/msg02885.html
关于VPP的acl-plugin配置参考:https://wiki.fd.io/view/VPP/SecurityGroups
一、ACL_PLUGIN实现访问控制
这里使用了VPP提供的一个VAT客户端程序,VAT CLI(vpp_api_test command line interface),用于简单测试。建议参考https://wiki.fd.io/view/VPP/SecurityGroups。注意,官方不提供debug版本VAT对ACL的支持,所以需要采用release版本的VAT CLI(The ACL plugin does not supply the "supported" debug CLI for configuration, but has the full support for talking to it via VAT CLI)。可执行文件位于:
debug版本:vpp源码路径/build-root/build-vpp_debug-native/vpp/bin/vpp_api_test
release版本:vpp源码路径/build-root/build-vpp-native/vpp/bin/vpp_api_test
sudo systemctl start vpp
cd vpp源码路径/build-root/build-vpp-native/vpp/bin/
sudo vpp_api_test
......
vat#
1.1.ACL_PLUGIN控制命令归纳
通过如下命令可判断VPP的ACL主要工作在L2/L3/L4层。一个访问控制列表可以定义多个基于协议的规则,例如UDP/TCP/ICMP等。通过permit+reflect反向策略,可以实现轻量级的会话追踪功能。MACIP访问控制列表定义了IP+MASK和MAC+MASK同时使用的规则。需要注意的是,IP规则和MACIP不能同时定义在一个ACL中。
- acl_plugin_get_version : 获取acl插件版本
vat# acl_plugin_get_version
vl_api_acl_plugin_get_version_reply_t_handler:133: ACL plugin version: 1.1
vat#

- acl_add_replace :增加或替换ACL规则
增加或替换一条控制列表。当替换时,需要指定ACL规则ID号。
VAT命令行语法范式如下:
acl_add_replace
[<ipv4|ipv6> <permit|permit+reflect|deny|action N> [src IP/plen] [dst IP/plen] [sport X-Y] [dport X-Y] [proto P] [tcpflags FL MASK], ... , ...
增加某访问控制规则:
vat# acl_add_replace permit, ipv6 permit
vl_api_acl_add_replace_reply_t_handler:107: ACL index: 0
vat#
替换某访问控制规则:
vat# acl_add_replace 0 ipv6 permit dst 2001:db8::1/128, ipv4 permit src 192.0.2.1/32
vl_api_acl_add_replace_reply_t_handler:107: ACL index: 0
vat#
- acl_del :删除某ACL
仅需传递一个ACL ID即可删除
vat# acl_del 0
vat#
- acl_dump:罗列所有ACL列表
不需要任何参数就能罗列所有配置的ACL列表,也可以选择性显示某条ID信息:
vat# acl_dump
vl_api_acl_details_t_handler:193: acl_index: 0, count: 2
   tag {}
   ipv6 action 1 src ::/0 dst 2001:db8::1/128 proto 0 sport 0-65535 dport 0-65535 tcpflags 0 0,
   ipv4 action 1 src 1.1.1.1/32 dst 0.0.0.0/0 proto 0 sport 0-65535 dport 0-65535 tcpflags 0 0
vl_api_acl_details_t_handler:193: acl_index: 1, count: 2
   tag {}
   ipv4 action 1 src 0.0.0.0/0 dst 0.0.0.0/0 proto 0 sport 0-65535 dport 0-65535 tcpflags 0 0,
   ipv6 action 1 src ::/0 dst ::/0 proto 0 sport 0-65535 dport 0-65535 tcpflags 0 0
vl_api_acl_details_t_handler:193: acl_index: 2, count: 5
   tag {}
   ipv4 action 1 src 0.0.0.0/0 dst 0.0.0.0/0 proto 0 sport 0-65535 dport 0-65535 tcpflags 0 0,
   ipv4 action 1 src 0.0.0.0/0 dst 0.0.0.0/0 proto 0 sport 0-65535 dport 0-65535 tcpflags 0 0,
   ipv4 action 1 src 0.0.0.0/0 dst 0.0.0.0/0 proto 0 sport 0-65535 dport 0-65535 tcpflags 0 0,
   ipv4 action 1 src 0.0.0.0/0 dst 0.0.0.0/0 proto 0 sport 0-65535 dport 0-65535 tcpflags 0 0,
   ipv4 action 1 src 0.0.0.0/0 dst 0.0.0.0/0 proto 0 sport 0-65535 dport 0-65535 tcpflags 0 0

vat# acl_dump 2
vl_api_acl_details_t_handler:193: acl_index: 2, count: 5
   tag {}
   ipv4 action 1 src 0.0.0.0/0 dst 0.0.0.0/0 proto 0 sport 0-65535 dport 0-65535 tcpflags 0 0,
   ipv4 action 1 src 0.0.0.0/0 dst 0.0.0.0/0 proto 0 sport 0-65535 dport 0-65535 tcpflags 0 0,
   ipv4 action 1 src 0.0.0.0/0 dst 0.0.0.0/0 proto 0 sport 0-65535 dport 0-65535 tcpflags 0 0,
   ipv4 action 1 src 0.0.0.0/0 dst 0.0.0.0/0 proto 0 sport 0-65535 dport 0-65535 tcpflags 0 0,
   ipv4 action 1 src 0.0.0.0/0 dst 0.0.0.0/0 proto 0 sport 0-65535 dport 0-65535 tcpflags 0 0
vat#
- acl_interface_add_del (不推荐) : 从网口的访问控制列表中增减某项
acl_interface_add_del
| sw_if_index [add|del] [input|output] acl
- acl_interface_set_acl_list :给指定端口设置输入输出控制方式
该命令用来一次性设置某接口的所有输入输出访问控制规则。它不会使用已被应用过的ACL规则,如果使用会产生幂次迭代。
acl_interface_set_acl_list
| sw_if_index input [acl-idx list] output [acl-idx list]
范例:
vat# acl_interface_set_acl_list sw_if_index 0 input 0 output 0 1 2
vat#
解释:sw_if_index表示vpp中已经创建的接口,通过vppctl中命令show interface查看使用端口索引号。input表示进口方向采用ACL的ID号,output表示出口方向采用ACL的ID号。
- acl_interface_list_dump :显示哪个端口采用哪个访问控制规则
acl_interface_list_dump [<intfc> | sw_if_index <if-idx>]
这个命令罗列出哪个网口和哪个方向上所采用的访问控制列表。
vat# acl_interface_list_dump
vl_api_acl_interface_list_details_t_handler:152: sw_if_index: 0, count: 4, n_input: 1
   input 0
  output 0 1 2
vat#
- macip_acl_add:增加一条MAC/IP的访问控制列
macip_acl_add [ipv4|ipv6] [permit|deny|action N] [ip <ADDR>/<PREFIX-LEN> mac <MAC> mask <MAC-MASK>, ...
vat# macip_acl_add ipv4 permit ip 1.1.1.1/32 mac 00:01:02:03:04:05 mask ff:ff:ff:ff:ff:ff, ipv6 permit ip 2001:db8::1/128  mac 00:01:02:03:04:05 mask 00:00:00:00:00:00
vl_api_macip_acl_add_reply_t_handler:107: ACL index: 7
vat#
- macip_acl_del:删除一条MAC/IP的访问控制列
通过索引号删除某条MACIP访问控制规则
vat# macip_acl_del 6
vat#
- macip_acl_dump
罗列所有MACIP的访问控制列表
vat# macip_acl_dump
vl_api_macip_acl_details_t_handler:226: MACIP acl_index: 0, count: 0
   tag {}
vl_api_macip_acl_details_t_handler:226: MACIP acl_index: 1, count: 1
   tag {}
   ipv6 action 1 ip ::/0 mac 00:00:00:00:00:00 mask 00:00:00:00:00:00
vl_api_macip_acl_details_t_handler:226: MACIP acl_index: 2, count: 1
   tag {}
   ipv6 action 1 ip ::/0 mac 00:00:00:00:00:00 mask 00:00:00:00:00:00
vl_api_macip_acl_details_t_handler:226: MACIP acl_index: 3, count: 1
   tag {}
   ipv6 action 1 ip ::/0 mac 00:00:00:00:00:00 mask 00:00:00:00:00:00
vl_api_macip_acl_details_t_handler:226: MACIP acl_index: 4, count: 1
   tag {}
   ipv4 action 1 ip 1.1.1.1/32 mac 00:01:02:03:04:05 mask ff:ff:ff:ff:ff:ff
vl_api_macip_acl_details_t_handler:226: MACIP acl_index: 5, count: 1
   tag {}
   ipv4 action 1 ip 1.1.1.1/32 mac 00:01:02:03:04:05 mask 00:00:00:00:00:00
vl_api_macip_acl_details_t_handler:226: MACIP acl_index: 7, count: 2
   tag {}
   ipv4 action 1 ip 1.1.1.1/32 mac 00:01:02:03:04:05 mask ff:ff:ff:ff:ff:ff,
   ipv6 action 1 ip 2001:db8::1/128 mac 00:01:02:03:04:05 mask 00:00:00:00:00:00
vat#
- macip_acl_interface_add_del: 从给定端口绑定/解绑MACIP某条访问控制列表
macip_acl_interface_add_del
| sw_if_index [add|del] acl
vat# macip_acl_interface_add_del local0 add acl 7
vat#
- macip_acl_interface_get:获取与某条MACIP 访问控制列表相关的所有接口
vat# macip_acl_interface_add_del local0 add acl 7
vat# macip_acl_interface_get
vl_api_macip_acl_interface_get_reply_t_handler:241: sw_if_index with MACIP ACL count: 1
  macip_acl_interface_add_del sw_if_index 0 add acl 7

vat# macip_acl_interface_add_del local0 del acl 7
vat# macip_acl_interface_get
vl_api_macip_acl_interface_get_reply_t_handler:241: sw_if_index with MACIP ACL count: 1
  macip_acl_interface_add_del sw_if_index 0 add acl -1

vat#
1.2.ACL_PLUGIN简单实验测试
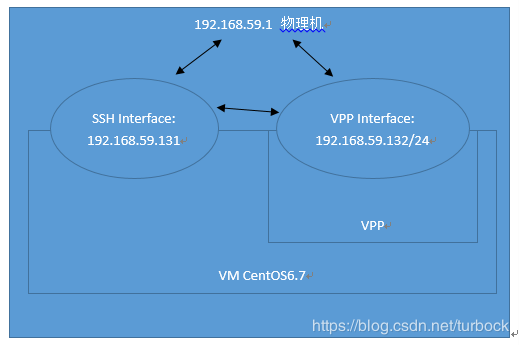
如图所示搭建了简单的测试环境,物理机采用NAT方式创建两网卡,物理机IP vmnet8 192.168.59.1,虚拟机网卡192.168.59.131用于SSH连接以及测试,虚拟机网卡192.168.59.132/24为采用VPP创建。
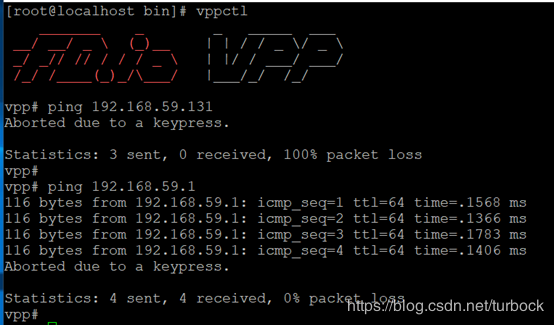
此时在VPP中测试,VPP网卡g0(192.168.59.132)可以ping通192.168.59.131以及物理机192.168.59.1。

此时进入VAT,因为默认访问控制方式为拒绝所有(参看本文章首页官方文档链接make it “deny by default”)。所以测试指定ACL规则是仅允许物理机192.168.59.1访问vpp中192.168.59.132端口。实验步骤及执行命令如下
##步骤1.配置访问控制规则
vat# acl_add_replace ipv4 permit src 192.168.59.1/32

##步骤2.将某些控制规则配置到某端口
vat# acl_interface_set_acl_list sw_if_index 1 input 0

##步骤3.查询端口绑定情况确认成功
vat# acl_interface_list_dump
通过ping测试,验证ACL功能成功执行。vpp中端口59.132可以ping通物理机59.1,但是无法ping通同一虚拟机中另外端口59.131。结果如下,这里是通过VPP的59.132端口发送ping包到59.131,被阻止无法ping通。同时,通过59.131端口ping59.132端口,也无法实现ping通。
通过VPPCTL CLI命令查询当前执行ACL
vpp#show acl-plugin acl
vpp#show acl-plugin interface

二、CLASSIFY实现访问控制
这里使用VPP提供的一个VPPCTL客户端程序,用于通服务端交互。参考文档:
https://wiki.fd.io/view/VPP/Introduction_To_N-tuple_Classifiers,
https://blog.csdn.net/weixin_40815457/article/details/86524227文章最后面。可执行文件位于:
debug版本:vpp源码路径/build-root/build-vpp_debug-native/vpp/bin/vppctl
release版本:vpp源码路径/build-root/build-vpp-native/vpp/bin/vppctl
sudo systemctl start vpp
cd vpp源码路径/build-root/build-vpp-native/vpp/bin/
sudo vppctl -c ../etc/vpp/startup.conf
......
vpp#
2.1.CLASSIFY中ACL命令归纳
- classify table: 创建删除匹配规则表。核心是mask,这里可自行构建mask或官方提供掩码****[hex] [l2] [l3 ip4] 等。mask
规则范式:
classify table [miss-next|l2-miss_next|acl-miss-next
]n mask buckets [skip ] [match ]n [current-data-flag ] [current-data-offset ] [table ]n [memory-size [M][G]] [next-table ]n [del] [del-chain].
其中mask的参数如下:
1.hex
2.l2 参数: src dst proto tag1 tag2 ignore-tag1 ignore-tag2 cos1 cos2
3.l3 参数: ip4 参数: version hdr_length src dst proto tos length fragment_id ttl checksum
l3 参数: ip6 参数: version traffic-class flow-label src dst proto payload_length hop_limit
4.l4 参数: src_port
l4 参数: dst_port
例子:
classify table mask l3 ip4 src
classify table mask l2 src next-table 0
classify table mask hex
000000000000ffffffffffff0000000000000000000000ff0000ffffffff000000000000

classify table table 2 del                #删除某条table
classify table table 2 next-table 3       #修改某条table的下跳table
- classify session:在规则表中添加具体规则
规则范式:
classify session [hit-next|l2-input-hit-next|l2-output-hit-next|acl-hit-next
|policer-hit-next ]n table-index match [hex] [l2] [l3 ip4] [opaque-index ]n [action set-ip4-fib-id|set-ip6-fib-id|set-sr-policy-index ] [del].
例子:
classify session acl-hit-next deny opaque-index 0 table-index 0 match l3 ip4 src 192.168.100.110
classify session acl-hit-next deny opaque-index 1 table-index 1 match l2 src 00:0c:29:e9:0e:9c
classify session acl-hit-next deny opaque-index 2 table-index 2 match hex
    000000000000000c29e90e9c00000000000000000000000100001e010164000000000000
- set interface [input|output] acl intfc:将规则表应用到接口上
规则范式:
set interface input acl intfc
[ip4-table ]n [ip6-table ] [l2-table ] [del].
例子:
set int input acl intfc GigabitEthernet2/3/0 ip4-table 0
set int input acl intfc eth0 ip4-table 0
- show XXX:显示相关信息table、table+session、policer等
规则范式:
show classify tables [index
][verbose].
show classify flow type [ip4|ip6].
show classify policer type [ip4|ip6|l2].
show inacl type [ip4|ip6|l2].
show outacl type [ip4|ip6|l2].

2.2.CLASSIFY简单实验测试
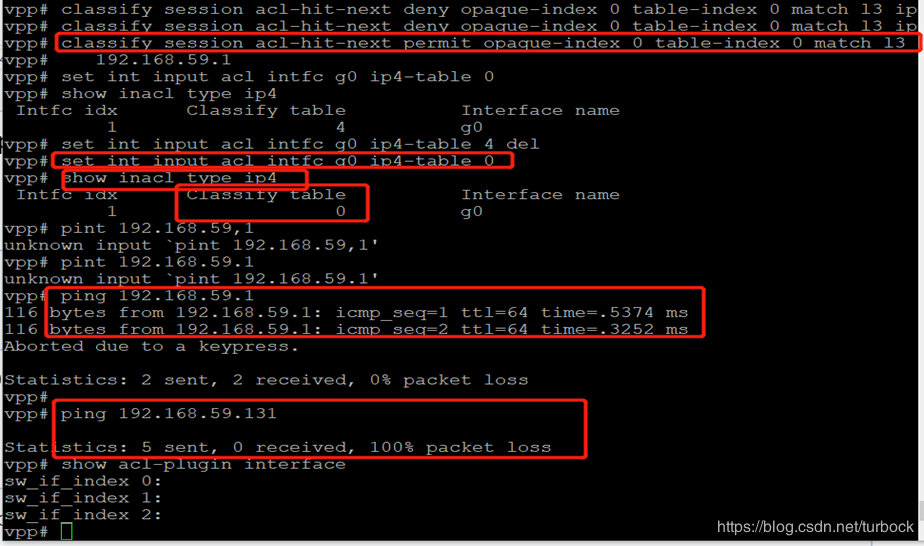
配置CLASSIFY实现访问控制步骤:
##1.创建匹配规则表
classify table mask l3 ip4 src buckets 16
##2.往规则表中添加规则,在此之前查询附加到哪个table表Id号
classify session acl-hit-next deny table-index 0 match l3 ip4 src 192.168.59.131
##3.将规则表应用到网口g0上,这里已将网口名改为g0
set int input acl intfc g0 ip4-table 0
同1.2测试环境的网络拓扑一样,这里同样设置,仅允许物理机59.1访问VPP中网卡59.132,并拒绝其他连接。设置完成后,无论是通过vpp的网卡59.132ping 59.1,还是反向59.1ping 59.132都无法ping通,表示实验成功。